Audio Research Reference 1 pre-amp
Over a year ago, we had a client ask for some advice on their ‘replacement parts’ proposals for an Audio Research Reference 1 pre-amp. Six months since the last parts were ordered, here’s P.B. talking us through what he’s changed and the result!
"Power Supply Stage:
1) 2 x sets of ‘industry-standard’ diodes replaced with 8 x UF4006 ultrafast or 12 x Shottky 8QT-100
2) 15 x Nichicon caps replaced with same value Panasonic FCs or FMs (no diodes or caps replaced in the ‘logic’ circuitry)
3) 2 x obsolete 470uF 450V Nichicon GQ replaced with 2 x 680uF 450V Mundorf M-Lytic (plus an additional 2 x same fitted between the PSU and Analogue PCB and connected to the ‘pins’ of the caps on the PCB)
4) 2 x obsolete 120uF as above replaced with 2 x 220uF 450V Mundorfs as above
Analogue Stage:
1) A total of 36 resistors (including input and output resistors) replaced with either Charcroft Z-Foils or 2W Amtrans AMRGs.
I’m very glad that you dissuaded me from using Charcrofts throughout. I think the 'clinical clarity’ would have made prolonged listening very uncomfortable. The balance between the two types works superbly well.
2) Wonder Infinicap output and by-pass caps replaced with a combination of;
Mundorf M-Cap Supreme Silver-in-Oil and Audyn True Copper Max
by-passed by Duelund Silver Foil Precision By-Pass caps
3) Original 4 x matched pairs of Sovtek 6922 valves replaced with 2 x matched quads of Genelex Gold Lions (this change was made sometime before the component upgrades so their sonic benefits were already apparent before the major modifications took place)
Miscellaneous:
1) IEC chassis plug replaced with Furutech F1-06 Rhodium NCF plug
2) Internal fuse holder replaced with Bulgin Ag-plated holder
3) Internal fuse replaced with Furutech Pure Transmission TF
3) Input and output wiring replaced with 4-braid Ag
4) 1 x pair RCA output connectors (all other connector are XLRs for balanced operation) replaced with WBT Ag Topline Nextgen and 18AWG solid Ag links to PCB
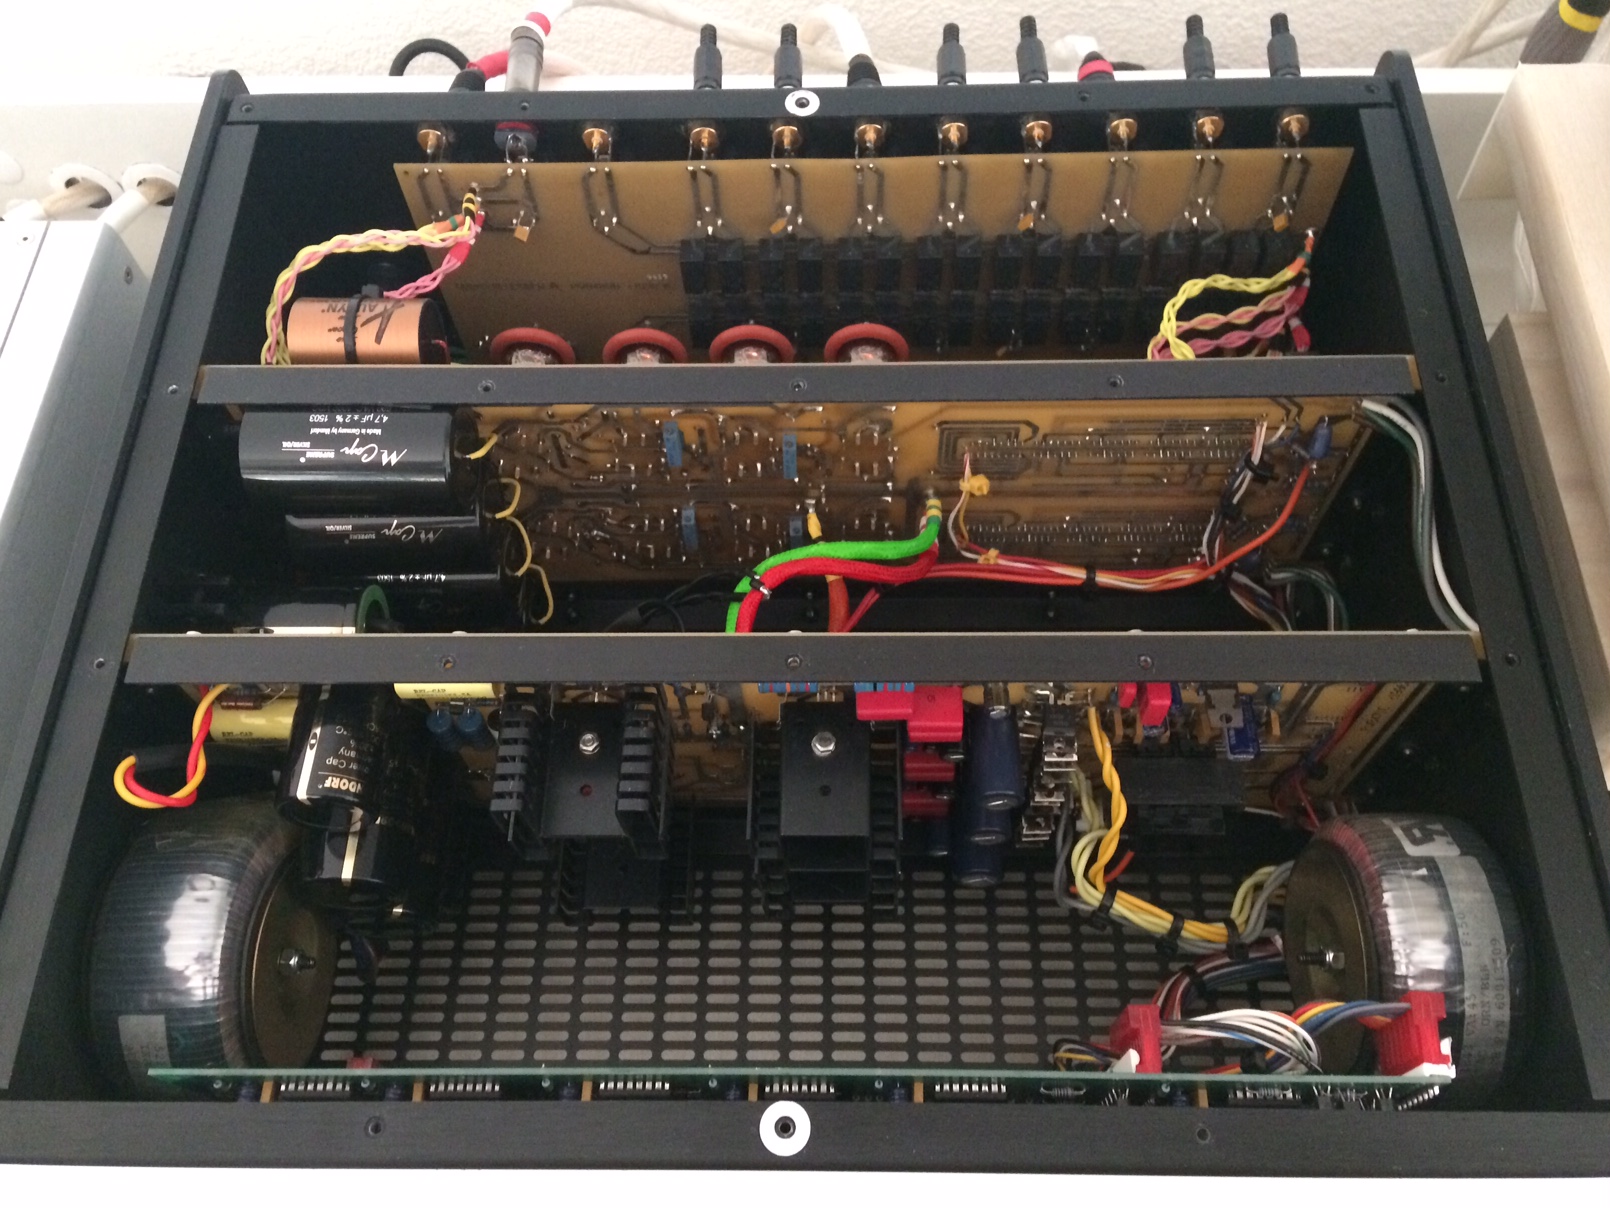
Here is a photo of the changes:

The 12 x Shottky diodes and Panasonic caps are on the right of the black heatsinks.
The Mundorf power reservoir caps are on the left with the upper, of the additional pair, just visible (the unused green cover on the self-adhesive ring) behind the PCB in front of the Silver-in-Oil output caps.
The Audyn True Copper Max caps can be seen behind the Mundorfs.
The Duelund By-Pass caps had to be located in two ‘side by side’ pairs in between the upper x 2 and lower x 2 Audyns, due to lack of space.
It wasn’t possible to use cable ties to hold the Mundorfs firmly to the PCB, so I developed a method using pads of self-adhesive neoprene between the PCB and the inner face of the capacitors. I gently pressed the cap against the neoprene to compress it slightly. Then, after soldering the tails, released the pressure. The neoprene tried to expand, but couldn’t due to the soldered joint. This produced an extremely solid, but 'non-damaging’ vibration-free fastening that ensured the capacitors were held very securely in place. I repeated this (together with cable ties) for the Audyn capacitors.
The braided input and output wiring and WBT sockets are also visible, as is some new braided Ag wiring to carry the current from the PSU to the analogue board. Black 'RFI-blocking' RCA plugs can be seen in all the unused input sockets.
Also, just visible, are some black-insulated single core endings to a 6-braid cable. The ends have tinned ‘hooks’ that are attached to any of the new, braided, internal power cables that have expandable sleeving on. The other end of the cable is connected to ground to prevent the accumulation of a static charge on the surface of the wiring. All my interconnect and speaker cables have a similar attachment.

I know all the cables etc look messy, but it’s only temporary. It’s been ‘temporary’ for around 10 years!
In early 2015 I completed some designs for an array of ‘Quadratic Residue Diffusers’ to go under the shelf to both hide the cabling and to expand the, already fairly impressive, sound staging capabilities of the system. Unfortunately it was at this point that I lost all communication with the workshop staff in the School of Art and Design, where I’d cut all the parts for most of the ‘wooden’ items I’ll be discussing.
As there are over 300 precision parts in my design I can’t make it by using a hand saw.
I initially intend to make a screen using a timber frame and white acoustically transparent fabric (been in stock for over 8 years!) to hide the cables. This was superseded by the QRD designs.
Looks like I’ll have to go back to the screen now. This month? Next month? ???
Top Shelf Left to Right:
Ayre Acoustics CD-5xeMP:
An extremely good piece of equipment, with top class electronic components. I've been thinking how to improve it, but haven’t as yet come up with a solution, apart from removing the 2 x internal transformers to a separate case, but without the workshops I can’t make the case. It would also mean complex umbilical connections, so this bit of equipment has, to date, remained ‘unsullied’. Apart from having an upgraded internal fuse and a double layer of ‘Heavy Duty Dedshete’ on the underside of the top panel.
Audio Research Reference 1 Pre-amplifier: Heavily modified:
A 20+ year old ‘valve’ classic, given to me by a friend in part-payment for designing and fitting out the interior of his specially built music room (a retirement present to himself).
I have recently completed a major upgrading of many internal components, as itemised above. The results have been very satisfying.
Musical Fidelity X-AS100 Power Amplifier: Heavily modified:
PSU:
My modifications comprised removing all the power supply components from the PCB (to eliminate interference with the signal stage due to both electro-magnetic fields and vibration).
The external power supply is housed in a separate wooden case and uses 4 x 10,000uF Nichicon ‘Gold Straight Through’ instead of the original Teapo 6,800uF reservoir capacitors.
The bridge rectifiers have been replaced with over-spec ‘ultrafast soft-recovery’ diodes and the cheap coupling caps with Mundorf M-Cap Supremes.
All these caps are by-passed under the dual-mono circuit boards. Instead of the usual ‘rectilinear’ type design, I used 2 x ‘organic’ designs, replacing the usual angles with gentle curves to ease electron-flow. The 4 x internal fuses have been replaced by Hi-Fi Tuning Silver Supreme fuses.
Electrical connections from the mains transformer, housed in a separate wooden case, are made via 18AWG HGA solid silver umbilical cables in a ‘4-braid around a silicone cord’* configuration.
One cable per channel. This is repeated to take the rectified current from the PSU to the Signal Stage. All the umbilicals are hard-wired at the ‘out’ and terminated with XLRs at the ‘in’.
Signal Stage:
All the Teapo electrolytic capacitors and basic polyester capacitors in the signal stage, were replaced with Black Gate electrolytics and Jensen ’NOS' ‘Paper-in-Oil’ with
Mundorf M-Cap Supreme ‘Silver-in-Oil’ used for the output caps.
The internal input and output wiring was replaced with 99.99% pure HGA solid silver wire, (22AWG for the inputs and 18AWG for the outputs) in '6-braid around a silicone cord’ configuration for the inputs and '8-braid around a silicone cord’ configuration for the outputs.
All the connectors were replaced with high quality Ag-plated types, the original RCA sockets being replaced by XLR connectors, wired in 'single-ended’ configuration. The MF amp is the only piece of my equipment that doesn’t have ‘balanced’ circuitry but, wherever possible I prefer to use Ag-plated Neutrik XLRs.
The signal stage sits on a lightweight isolation platform, above the separate power supply in a wooden case, also on a lightweight isolation platform.
This power amp is used to send signals to the upper enclosures of my speaker system. Photos in next message.
* I use silicone cord to absorb the vibration, generated by the ‘Mexican-wave’ effect of the electrons propagating the current through the cables. This is even more important for mains power cables.
Ayre Acoustics P-5 Phono Stage:
Like the CD player I can’t really find any parts that might be upgraded, (except perhaps the input/output resistors) so this item has only had a layer of ‘Heavy Duty Dedshete’ on the inner face of the bottom panel and, like the CD-5, a double layer on the underside of the top panel and upgraded internal fuse.
Origin Live Resolution 2 Turntable, with Origin Live Encounter Mk 3c Tonearm and (originally) ZYX R-100H cartridge.
The only modifications I’ve made to the turntable are to replace the original plastic box housing the external transformer with a wooded case and replace the OL feet with my own hardwood cones.
I recently had to have the cartridge completely rebuilt by Dominic Harper at Northwest Analogue because the suspension had completely collapsed and fused all the internal components.
I’m very glad, because the rebuild's performance is at least two orders of magnitude better than the original.
Floor Left to Right:
Transformer for Musical Fidelity X-AS100:
Copper lined (and grounded) wooden case has a Furutech rhodium-plated IEC and 2 x umbilicals (see X-AS100 notes above) to take the AC to the power supply case.
Bel Canto Evo.2 Power Amplifier: Modified:
The mains transformer and ’soft-start’ circuitry have been removed from the main amp case and put in a separate wooden case.
I also replaced all the original 15.000uF power reservoir capacitors with 22,000uF Mundorf M-Lytic Ag and the cheap output capacitors with Mundorf Evo Silver and Gold in Oil, there wasn’t enough
space to use the M-Cap Supreme ‘Silver-in-Oil’.
All the internal wiring has been replaced by 20AWG Ag-plated wiring in '6-braid around a silicone cord’ configuration.
This power amp passes signals to the lower enclosures of my speaker system.
Bel Canto Evo.2 Transformer Case:
The original IEC chassis plug, with built-in suppression was replaced with an upgraded type, and the internal fuse holder related with an Ag-plated one.
The internal fuse was also upgraded.
The 3 x sets of secondaries pass through a copper tape lined separate compartment before exiting the case via 3 x umbilicals (configured as above) to the main amp.
Transformer:
For the external motor drive for the OL turntable. Power is carried via 18AWG HGA solid silver wire in a '4-braid around a silicone cord’ configuration.
All the power, interconnect, and speaker cables have been designed and made by me, as have the 2 x Power Distribution Blocks and ‘Star’ Ground System.
Power-Distribution Block Cables:
2 x cables, each 24-core 20AWG Ag-plated in 4 x '6-braid around silicone cord' (and held tightly against it by expandable sleeving), are then 'braided together’ and enclosed in another expandable sleeve. The cables are terminated with MK Ag-plated plugs and bring AC power from an Ag-plated MK Pro-Logic un-switched wall socket to each of 2 x power blocks. The double wall socket is fed by an oversized mains cable ‘loop’. I installed this in the days before I made my own cables and there isn’t enough space to upgrade it further.
Each block has 2 x double sockets configured as in the above photo and all internal wiring in the blocks is Ag-plated, 12 cores per polarity. Both blocks are connected to the ‘star’ ground block by 6-braid copper cables.
These blocks distribute power to the individual items of equipment.
Individual Power Cables:
16-braid (4 x 4-braid around silicone cords, which are then braided around a central silicone cord) 18AWG solid Ag. These individual power cables preceded the above power distribution block cables and so are of an earlier design. This is ok as the solid silver wires are much less flexible than the ‘stranded’ Ag-plated wires and don’t need to be held against their cords, as they hold position by themselves.
OR
24-braid Ag-plated cables in 4 x '6-braid around a silicone cord configuration', then braided around a central 3-braid copper ground wire, before being encased in an expandable sleeve. These cables should be re-made to match the inner expandable sleeving of the distribution block versions. Only the 2 x REL subwoofers (photos coming in next message) are powered by this design of cable.
All cables have Ag-plated MK mains plugs (hardwired without fuses) and Ag-plated or Rhodium-plated Wattgate type IEC connectors at the equipment end.
DC Offset Protection:
A couple of my mains transformers had started to hum quite badly and I discovered that it was probably DC pollution on the mains supply. This had apparently increased because my neighbour, who works from home, had recently installed a new computer system and this was feeding enough pollution back into the mains supply to cause the noise problem. Pollution was always there, but the new computer tipped the balance.
Counteracting this has yielded great benefits, but my first attempts were less than successful.
The circuitry I first bought and installed had little or no effect, so after discussing it with a genuine hifi-guru, whom I had met a couple of years earlier, I was provided with a sample circuit to try.
It worked superbly well. I just needed to work out how to maximise the performance.
Each cable has an aluminium case, (connected to ground by a 6-braid copper cable) containing circuitry not only to remove DC offset interference present on the mains supply, but also to prevent any interference originating from the equipment itself, getting back into the mains and polluting adjacent equipment.
This ‘pollution-feedback’ could happen if the ‘normal’ approach of only using this type of protection on a power distribution block cable is adopted.
Each of the 2 x cables carrying power to the distribution blocks has the same type of circuitry, but x 3 in ‘parallel; series; parallel’ configuration. This means that each piece of equipment is protected from mains interference by 2 x parallel and 2 x series circuits and this provides excellent protection.
This configuration was arrived at after extensive testing of a wide range of options when it was found that in addition to removing DC Offset, this permutation also made a significant improvement to the clarity and ’spatial’ resolution of the system.
Equipment Grounding:
Every piece of equipment has a separate ground terminal that is connected to the chassis at the equipment end and a '6-braid’ cable connects this to a ’star-ground’ block’ via ‘banana’ plugs or spades.
In addition, all the expandable sleeving on the interconnects and speaker cables, (as well as some of the power supply cabling in the upgraded pre-amp) is also grounded to the star-ground block. This earths any build up of static electricity and prevents a static field contaminating the audio signal.
Equipment Isolation:
I initially followed conventional wisdom and used heavy platforms and stands to protect my equipment from airborne vibrations.
Unfortunately, this type of isolation does nothing to address the issue of vibrations within the equipment itself, as every electronic component vibrates as current passes through it. If you stand equipment on something heavy, external vibrations many not be able to get in, but equally, internal vibrations can’t escape, so they pollute the audio signal.
However, if you place the equipment on extremely lightweight platforms that don't store energy, so vibrations pass through quickly, and you protect the internal components more effectively. To prevent external vibrations from passing into the equipment I attach 3 x hardwood cones and place it on a lightweight platform, also on cones, on a heavy surface.
Vibration is taken from the equipment, through the platform and into the supporting surface, but can’t easily return because the only point of contact is…..a point.
I have modified the way I make the platforms over the years. Originally I rebated the frames so the top and bottom 2.5mm ply panels were inset, so their edges were hidden. This was fine, but time consuming to make.
Now the top and bottom panels are glued to the frame, but the exposed edges are covered by thin veneer. The complex internal grid, necessary to ‘dampen’ resonance, is also made from 2.5mm ply, slotted and glued together and rebated into the frames. Each of the grid strips (and many of the outer frames, depending on the platform size) has the majority of material removed by drilling holes through to save weight.
The first lightweight stands and cones I made were for my previous Monitor Audio speakers and I was amazed by the improvement in sound. there was more separation between instruments, the high frequencies were clearer and the bass became more tuneful. Generally the sound just seemed more ‘relaxed’.
The cones (varying angles and heights depending on function) are made from hardwood rolling pins.The ends are sanded on a disc sander, with the guide set to the required angle, cut approximately to size and then machined accurately in sets of 3 to prevent 'micro-rocking'.
The speaker cables are held up off the suspended wooded floor (vibration nightmare) by stands, tall ones for the high frequency cables, low ones for low frequency cables. The height is simply to better align with the relevant external crossover feeding the particular speaker enclosures.

View from Door into Room.
You can see the left-channel speaker enclosures I designed with their external crossovers (photos of inside of x-overs below).
Upper Enclosure:
This houses 2 x Scanspeak drivers, a Revelator 15M 4531K00 for 480Hz - 2.5kHz and an Illuminator D3004/6620002 for 2.5kHz - 30kHz.
The enclosure has no parallel faces and has internal bracing along every angle and a ‘drilled out’ centre cross-brace. Every internal surface is covered with Deflex acoustic damping panels.
The drivers are bi-wired via Ag-plated CMC binding posts and are also connected to the ‘star-ground’ block via a 6-braid copper cable.
The enclosure has a strengthened 25mm thick base and is mounted on cones and a lightweight platform, that in turn has cones and is mounted on a heavy ‘vibration sink’, separated from the lower enclosure by viscous damping sheets.
Lower Enclosure:
This houses a Volt DVC220.1 driver that handles the frequencies up to 480Hz. There is an additional internal front panel, behind the curved edge front baffle, giving a total baffle thickness of 36mm. The rear, base and top panels are 25mm. This enclosure also has all internal angles braced and a double front-to-back cross-brace, drilled out as above, to reduce ‘solid’ volume, but retain strength. All internal surfaces are also covered in Deflex and Red Copper CMC binding posts are used as the current speaker cables are 24 x 18AWG cores of copper, braided as descried in the previous message. The driver is connected to the ground block as above.
The enclosure is mounted on cones and a lightweight isolation platform, that also has cones.
Subwoofers:
Because I found that the lower frequencies (60Hz down) tended to increasingly drop below the general 92dB sensitivity level, from 60Hz down is reinforced by a pair of REL T9 subwoofers, using less than 1/4 of their volume.
The edge of one can just be seen behind the lower enclosure.
I’m in the process of taking the 300W class A/B amps and transformers out to install them in external cases, I have already lined the internal faces with Jantzen damping sheets (Deflex having gone out of business).
All the enclosures are on hardwood cones and lightweight isolation platforms, as described previously.
You can also see the left channel acoustic treatment panels, but the info on these is included below.
Crossovers:
These can be seen on their respective cones and platforms behind the enclosures in the photo above.
Upper Crossover (powered by the MF X-AS100):
This has two separate circuits that split the frequencies to send them to midrange and tweeter respectively.
The components are hard-wired under the 6mm thick board.
Midrange:
Series Components:
Mundorf M-Coil Type LL60 (Baked Varnish) Inductor and a 90%:10% combination of Clarity Cap ESA and Mundorf M-Cap Supreme capacitors.
I would like to upgrade the 40uF ‘bank’ of capacitors to Jantzen Alumen-Z Caps (and possibly use the current ones as parallel caps in the L/F x-over) but, as can be seen from the photos below, I don’t think there would be space without completely re-making the board/s.
Parallel Components: ‘thin wire’ inductor and Mundorf M-Cap Supreme capacitor.
Tweeter:
Series Component:
Mundorf M-Cap Supreme Silver-in-Oil capacitors
Parallel Component:
Mundorf M-Coil Type LL60 (Baked Varnish)inductor
All capacitors are by-passed (under the board) with Duelund Silver Foil Precision By-Pass caps
Component Side: Hardwire Side:


Lower Crossover (powered by the Bel Canto Evo.2):
This passes frequencies up to 480Hz
Series Component:
Mundorf M-Coil Type T250 (Vacuum Impregnated)
Parallel Component:
Ansar Supersound Capacitor
This capacitor is by-passed (under the board) with Duelund Silver Foil Precision By-Pass caps
Sorry, only a ‘work in progress’ photo for this crossover


Looking towards the right channel speakers you can see more of the acoustic treatment panels.
I have tried to reduce the amount of ‘reflected’ sound reaching the listener’s ears, by putting appropriate panels in the ‘first reflection’ points for every driver, for any position on the ‘listening’ sofa.
The upper midrange to high frequencies are treated by the 2 x ‘darker’ white panels. These are simple Knauf insulation ‘absorber’ panels.
I admit to being rather surprised when I first tried them.
The clarity of the system was already good. Helped no doubt, by listening in the ’near-field’ only a few feet from the speakers, but not hearing any sound from them, unless the recording mix placed sound in a forward position. Actually, that’s not quite correct. Any surface noise on vinyl comes directly from the speakers, rather than appearing to be part for the music. But that is a real advantage as it makes it easier to ignore. Not that I have to suffer very often with this issue.
I take meticulous care of both media formats, using a Clearaudio Smart Matrix RCM and L’Art du Son to clean all vinyl (including new before playing), employing 15 rotations per direction per side on at least 3 separate occasions, playing between. My stylus (a Geiger Signature tip) is cleaned using an Onzow Zerodust Cleaner after every side.
My CDs are cleaned twice using L’Art du Son CD Cleaner. Both vinyl and CDs are treated multiple times on each side (more times on CD ‘label’ sides than playing sides, due to the metallic content of the printing inks) using my Furutech De-Mag and then 3 times on each side using my Furutech De-Stat.
Vinyl is also ‘swiped’ for 2 x rotations using my Furutech SK-11 Brush before the De-Stat is used whilst it is rotating on the platter. Rather OCD perhaps, but it does make a difference.
A ‘non-hifi’ friend brought round an album he had just purchased. We listened to the first track without any treatment, then again after the regime described above. He was amazed at the improvement in sound. It was louder, with greatly increased clarity and instrument separation, coupled with an improved sense of timing and musicality.
The same thing happened with another friend who bought a used CD copy of ‘Marjorie Razor Blade’ by Kevin Coyne. It was virtually unplayable.
It’s a rather ‘bleak’ album to start with, quite a ‘difficult’ listen and the sound re-inforces this feeling. That’s just the nature of the music, but this one sounded so ‘thin’ and 'flat’ that we had to stop!
After the above treatment it sounded so good that I also bought a used copy.
Anyway, back to the panels. The ‘lighter’ white panels are ‘air-spring’ lower midrange and bass’ panels. The one by the ‘Knauf’ panels is also in the ‘first reflection’ point for each subwoofer.
Each panel has at least 2 x different sized, completely gas-tight, internal compartments, using air spaces behind the Knauf insulation and a very small space in front of the insulation, to dampen the movement of the plywood fronts. All the ‘corner' panels use 2 x different thicknesses of plywood for their fronts.
The vibration of the front panel is immediately attenuated by the internal insulation.
Both the different front thicknesses and the ‘multi-compartmental’ design enable a range of frequencies to be handled.
I’m rather disappointed that I now don’t have access to the machines I need to make the array of Quadratic Residue Diffusers to go under the equipment shelf. In addition to hiding all the cables etc they would, I’m fairly sure, have further increased the system’s sound staging ability.
Also to be seen is a small ‘trihedral’ absorber panel where the sloping ceiling meets the rafter. This acts like the floor-standing absorber panels to reduce the distortion produced by sound bouncing between all the surfaces in corners.

Looking back towards the door, on which are two multi-compartment ‘air-spring’ bass traps with a larger ‘trihedral’ absorber in the junction of walls and ceiling.
Here is my evaluation of the improvements to the pre-amp’s performance.
As I have already said, I think that the sonic results of any component ‘upgrades’ are ultimately dependent upon the ability of the rest of the system to pass on any improvement.
Although I think my system is fairly good at doing this, I’m certain that improving some aspects further would enable me to hear even more from the work done on the pre-amp.
Anyway, my considered opinion is that there are improvements to just about every aspect of sonic performance.
An indication of this was clearly evident when I first switched on but, over the last couple of months, as the components and soldered joints etc have ‘burned-in’, this indication has blossomed into something special.
There is a wonderful 'crystalline clarity', without any sense of harshness, to the upper frequencies. The sound of a triangle, heard through the rest of the orchestra, or the ‘shimmer' of a brush on cymbals is spellbinding.
I tried to ‘go a step too far’ by playing a recording by The English Concert of some of Bach’s concerti for 3 or 4 harpsichords. Absolutely no signs of edginess, just an appropriate attack on the leading edge of notes and a wonderfully resonant decay.
The subtlety and nuancing of instrument timbres across the entire frequency range is clearly evident, with a convincing ‘weight’ and ‘authority’ to drums and a ‘crisp’ resonance to other percussion. Brass has ‘bite’ and woodwind instruments have a ‘mellifluous’ character.
I suspect that this may be due to the use of the Mundorf M-Cap Supreme Silver-in-Oil and Audyn True Copper Max output caps, coupled with the use of Duelund Silver Precision Bypass caps.
I tried again with complex orchestral passages like the 1987 Rattle/CBSO recording of Mahler’s 2nd Symphony.
Some chance, every instrumental, or vocal line could be followed with ease, not only in a temporal, but also spacial sense. The fabulous rendition of ‘timbre’ gives every instrument a genuine and individual character.
However, when there is a need to get ‘down and dirty’, for example on The Black Key’s 2012 ‘Chulahoma’, the pre-amp does that with equal ease.
It almost made a Merzbow album listenable, but not quite. Not mine I hasten to add!
Every instrument also seems to have a much more clearly defined ‘space’ in the mix, which emphasises the interaction between different musicians and the general ‘development’ of the musical idea.
It’s just much more like listening to real musicians, playing real instruments, rather than listening to good recordings.
For example, listening to ‘Been on a Train’ from Laura Nyro’s ‘Christmas and the Beads of Sweat’ album is heartbreaking and the arrangement, particularly the percussion, on ‘Upstairs By a Chinese Lamp’ is magical.
Om’s 2012 album ‘Advaitic Songs’ fills the room with deep, but very tight and ‘solid' bass that underpins the musical development.
The ‘buzz’ when a string is not quite fully pressed to the fingerboard, as occasionally on Danny Thompson’s double bass, or the crescendos from the guitars, during ‘Bittern’ from Bert Jansch’s ‘Avocet’ album, gives a tangible sense of the musicians being ‘in the room’.
The midrange is superb. Voices stand out from the mix with a genuine sense of ‘presence’ and not only can you hear the singer breathing on many recordings but sometimes also hear lips parting, or a tongue touching the roof of the mouth!
So, not only is it easy to follow lyrics, but even more importantly, the emotional ‘charge' of both the words and the character of the voice is clearly evident, as on the last Leonard Cohen album ‘You Want It Darker’.
Finally the soundstage has also considerably improved, both in terms of width and depth, but also in height.
Given that my speakers are only a few feet from the listening position there is absolutely no sense that they are creating the sound, unless the mix dictates that some sounds do come from a forward position.
Generally the music seems to emerge from wherever in the ‘room’, or even ‘outside’ of the room, the players happen to be.
These qualities have been noticed, not just by me, but by my ‘audiophile’ friends too. I was particularly surprised by the response from one, who has a wonderful vinyl-based system and who consistently dismisses CDs as an 'inferior life-form’. He was amazed, both at the ‘relaxed’ character of the sound and at the effortless sound staging and ‘pin-point’ placement of instruments and voices.
Anyway, large orchestral forces, with or without choral support, dense mixes of electric instruments, solo voices and acoustic instruments, or even 1980’s synth-based music, the pre-amp takes everything in its stride. It seems that virtually everything that is on the disc becomes audible.
I’m sure that’s not true and that if I could afford to use Duleund Silver ‘Cast’ capacitors in my crossovers and Audio Note Silver Foil signal capacitors in my amplifiers etc etc or just buy something like DarTZeel amplification and Magico speakers, I would hear even more.
But I can’t so I’m perfectly happy to enjoy music with what I have.
I am constantly delighted and amazed, not only at the ability of the pre-amp to communicate the very essence of the music I am hearing, but also to do it in an absolutely ‘self-effacing’ manner. It simply seems to disappear.
Wonderful though it is, the rebuild isn’t a ‘magic bullet’ to counteract poor recordings.
It just extracts a great deal from the recording and passes it on for the rest of the system to pass on in turn.
I have to say that I was pleased with my pre-amp before the upgrade, but the difference the new parts have made is astounding.
Now, whenever I switch on the system I prepare myself to be ‘transported’ by real musicians, playing real instruments………together, (you can almost see them looking at each other) just for my pleasure!
What else could one ask for?
Sorry for going on, and on and on!
Best wishes to all at HFC
P.B."
A big thank you to P.B. for sharing his wonderful HIFI with us, we love hearing and seeing how our customers projects turn out and are always happy to see suggestions work out!
If you've built or modified a system and would like to get in touch, please dont hesitate to email us at info@hificollective.co.uk!