Glasshouse Interconnect Cable Kit No.13
Click to Zoom
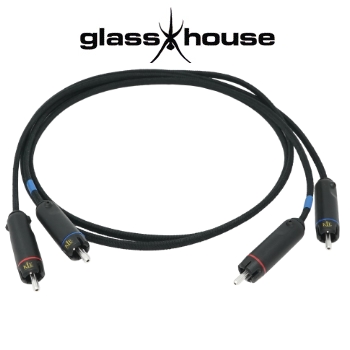
With the arrival of the new Duelund DUAL DCA16GA, we thought it deserved a kit build feature. This version holds 2 of the DCA16GA wires within a cotton and oil sleeving. With 2 conductors, it makes the Dual ideal for signal cables, interconnects, and speaker cables. The Glasshouse Interconnect kit No.13 is an amazingly simple and quick cable to make.
Instructions:
- First, cut your length of wire into 2 equal lengths.
- At one end, strip the outer layer of cotton sleeving by 15mm, exposing the 2 conductors.
- For each conductor, strip back 7mm to expose the multistrand wire. Twist the strands of each conductor tightly together and tin with a small amount of solder. (DO NOT JOIN BOTH CONDUCTORS TOGETHER).
- Separate the RCA plug shell from the body of the 2 red-marked RCA plugs and take out the grommets.
- Cut a 7mm length of the blue 6.4mm heat shrink.
- Place the RCA body in a vice to hold firm for soldering. Identify the RCA signal solder tag. (THE ONE WITHOUT THE EXPOSED EDGING RUNNING THROUGH THE THREADED PART)
- Solder one conductor to the RCA signal solder tag. The tags will cope with soldering easily, but don't solder for a prolonged amount of time, as you will melt the plastic.
- Solder the other conductor to the earth (return) tag.
- At the other end, fit the shell and screw onto the RCA body.
- Also, fit the grommet at the other end and slide down to fit into the shell and fit the grub screws.
- Position the 7mm of heat shrink 8cm from the RCA signal spigot tip and fit using a heat gun. This denotes directionality. Make this end the source end. So, if your interconnect was connecting a CD player to a pre-amplifier, the blue-marked end would fit into the CD player.
- Now, to fit the RCA plug to the other end. Thread on the grommet and then the RCA shell, making sure they are the right way round. Hold the body of the RCA plug in a vice and prepare the conductors as described in steps 2 and 3.
- Using a multimeter on the resistance setting, identify which is the bare conductors is the signal and the earth (return) and solder up accordingly.
- Screw on the shell to the RCA body, then the grommet, and then fit the grub screws.
- It is always good practice to check your soldering and channels for continuity with a multimeter before using a cable, even if it seems obvious.
Available from 0.5m pair to 2m pair, supplied as a kit or finished cables (+£35.00)
The following list is content for a 1-metre pair.
- 2m x Duelund DUAL DCA16GA tinned copper multistrand wire in cotton and oil
- 1 x KLE Innovations Copper Harmony RCA Plug (pk of 4)
- 50cm x Mundorf 3.8% silver/gold solder
- 5cm x 6.4mm blue heat-shrink
PRICE for a stereo pair (from)
£73.54 +vat +p&p
Big Picture
Large picture95.42 KB
Disassembled Soldered Plug83.93 KB